
TL;DR
Acoustic dampening in small closets requires a mix of absorption, sealing gaps, and strategic placement. Moving your rig to another room is often the simplest, most effective fix. Proper ventilation is critical in sealed spaces to prevent overheating and damage.
Imagine turning a tiny closet into your private recording studio. The idea sounds simple—add some foam and close the door, right? But if you want real results, it’s about much more than that. You need to understand how sound moves, where to put your treatment, and how to keep your gear cool.
This guide peels back the curtain on making a closet booth work for voice-over, podcasting, or even singing. You’ll learn how to dampen reflections, block sound leaks, and set up your gear without turning your closet into a heat trap. Ready to transform that cramped space into a quiet, professional-sounding sanctuary? Let’s go.
Acoustic dampening
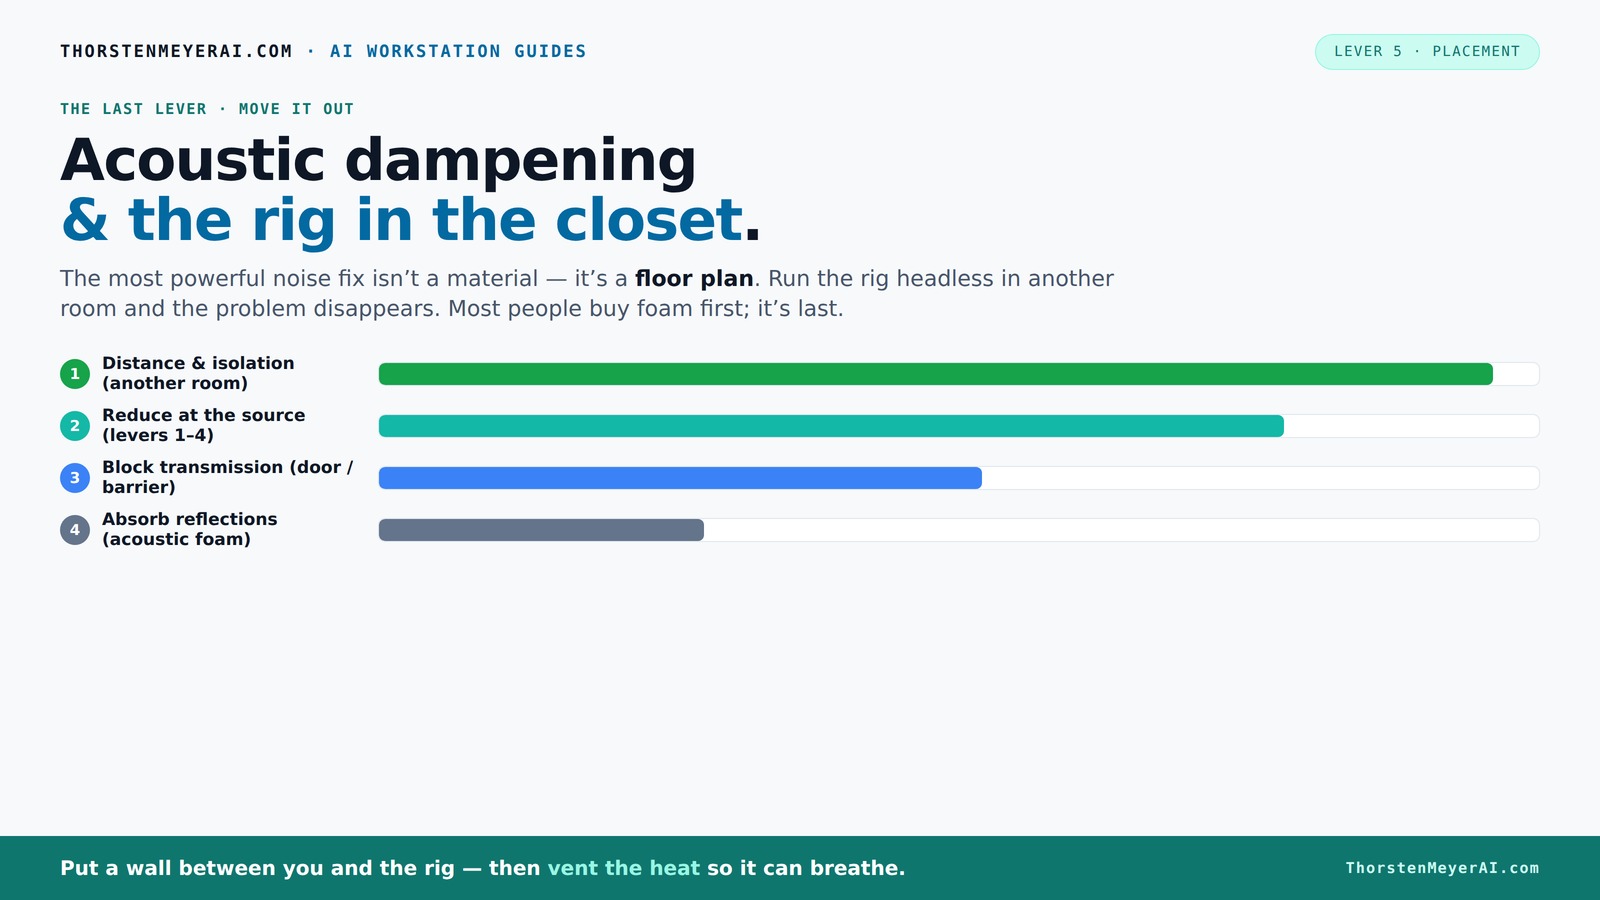
& the rig in the closet.
The most powerful noise fix isn’t a material — it’s a floor plan. A rig you can’t hear because it’s in another room beats any amount of foam. Tap the approaches in Part 1 to see what actually works.
(another room)
(levers 1–4)
(door / barrier)
(acoustic foam)
Contain the noise, not the heat
Key Takeaways
- Moving your rig into another room is often the simplest way to eliminate noise issues altogether.
- Acoustic treatment works best when placed at reflection points—behind the mic and on side walls—rather than just filling corners.
- Sealing gaps around doors and outlets is essential to prevent sound leaks, especially in small closets. For more tips, check out this guide on acoustic treatment.
- Proper ventilation is non-negotiable in sealed spaces; quiet exhaust fans or duct systems keep your gear cool without noise.
- Don’t rely solely on foam panels; combine absorption, sealing, and ventilation for a professional sound environment.

Focusound 52 Pack Acoustic Foam Panels 1" x 12" x 12" Sound Proof Foam Panles Soundproofing Noise Cancelling Wedge Panels for Home Office Recoding Studio with 300PCS Double-Side Adhesive
Soundproofing - Acoustic foam panels triangular grooves structure for better noise absorption, helps to reduce and absorb unwanted...
As an affiliate, we earn on qualifying purchases.
As an affiliate, we earn on qualifying purchases.
What a closet booth can and can’t do for your sound
A closet booth can significantly improve your audio quality—if you understand its limits. It’s excellent at reducing echoes and controlling reflections within the space. But it’s not magic—sound can still leak out through gaps, doors, or hard surfaces.
Think of it like a mini control room: effective sealing and treatment make the biggest difference. For example, a closet with thick blankets, foam panels, and sealed gaps can cut noise transmission by 50-70%. Yet, without proper ventilation, heat builds fast, risking overheating and throttling your gear.
Real-world scenario: a creator used foam panels and weatherstripping in a small closet. The sound was much clearer, but the CPU temperature soared. Adding a small, quiet exhaust fan solved both problems—quiet acoustics and cooling.

ATS Acoustics Home Office Residential Acoustic Treatment Room Kit Sound Absorbing Acoustic Panel 6 Pack for 50-100 Sq Ft (Blue Smoke)
6 Piece Kit contains 4 wall panels and 2 ceiling panels, each panel is sized 24" x 48"...
As an affiliate, we earn on qualifying purchases.
As an affiliate, we earn on qualifying purchases.
Acoustic dampening basics: what really works in small spaces
Acoustic dampening in a closet means controlling how sound bounces around. The most effective tools are thick, dense materials—like 2 to 4-inch foam panels or bass traps. Rugs and blankets help reduce floor and wall reflections, especially on hard surfaces.
For example, a creator placed foam panels at reflection points—above the mic, behind it, and on the side walls. This setup cut echo by over 60%, making voice recordings sharp and clear. But foam alone isn’t enough—gaps around doors or outlets let sound escape.
According to research, thicker panels absorb lower frequencies better. So, for small closets, 2-inch panels work well; bigger, 4-inch panels handle the low end more effectively.
Why does this matter? Because in small spaces, low-frequency sounds—like bass or room resonance—tend to build up, creating muddiness. Thicker panels and bass traps target these problematic frequencies, providing a more balanced, clear sound. However, tradeoffs include increased cost and space consumption, so you must balance treatment density with available room.

VEVOR Portable Vocal Booth, 6.56 ft Height, Portable Recording Studio with Travel Bag, Mobile Tablet Stand, Thickened Soundproofing, Sound Isolation Booth for Echo-Free Vocals, Podcasts, Voiceovers
Say Goodbye to Echoes: Built with durable Oxford cloth and acoustic padding, this recording booth for the home...
As an affiliate, we earn on qualifying purchases.
As an affiliate, we earn on qualifying purchases.
Best placement for panels and blankets: where to treat for the clearest sound
Placement is everything. Acoustic panels should go where your mic ‘hears’ the most reflections—usually behind the mic, on side walls, and at the ceiling’s reflection points. Moving blankets are best hung on walls that face the mic or at the door to block sound leaks. Learn more about proper acoustic setup at this site.
For example, a podcaster in a tiny closet mounted foam on the wall behind the mic and used moving blankets on the door. When done right, the room sounded tight and professional—no echo, no major leaks.
Tip: Use a mirror or a phone camera to spot reflection points—these are your best spots for treatment. Remember, tiny rooms often create standing waves, so treat multiple surfaces to balance sound.
Understanding the importance of placement means recognizing that the goal is to absorb or deflect sound before it reaches your microphone. Misplaced treatment can leave you with muddled recordings or residual echo. Therefore, take the time to identify and treat the most reflective surfaces—this strategic placement maximizes your investment in acoustic treatment and results in clearer recordings.

Weather Stripping Door Seal Strip - Soundproof Q-Shaped Foam for Exterior Door Frame, Large Gap Seal, Noise Cancelling, Easy to Install (Black, 26FT)
No light penetration: Our door seals are made of high-density foam core material, which effectively blocks light from...
As an affiliate, we earn on qualifying purchases.
As an affiliate, we earn on qualifying purchases.
How to build a “rig in the closet”: gear setup, placement, and ventilation
Setting up your gear in a small closet isn’t just about the mic and stand. Think about how to keep your setup organized, accessible, and cool. Place your mic at the right height—about mouth level—and away from reflective surfaces like the wall behind it. For more on gear setup and ventilation, visit this resource.
Use a sturdy stand and route cables neatly to avoid reflections or noise. For ventilation, install a quiet exhaust fan or a small duct system. A good rule: cool air should flow in, hot air out—without creating noise or drafts.
One creator installed a small, thermostat-controlled vent with an inline duct fan, which kept the temperature stable even during long recording sessions. This prevented overheating and fan noise from ruining your take.
Why does this matter? Because heat buildup can cause equipment to throttle or fail, and noise from fans can be picked up by your mic, ruining recordings. Proper placement and ventilation ensure your gear performs optimally without distraction or risk of damage.
Investing in a well-planned setup minimizes the need for costly repairs or adjustments later. It’s about balancing sound quality, safety, and convenience so your closet can serve as a reliable, high-quality studio.
Common mistakes that ruin your closet booth’s sound and how to avoid them
Many beginners make the mistake of thinking foam panels alone will turn a closet into a studio. While helpful, foam doesn’t block sound leaks or prevent echoes if gaps remain. Sealing cracks and gaps around the door or outlet openings is essential. For detailed tips, see this article.
Another error: ignoring ventilation. A sealed space traps heat, which can cause your PC or mic to overheat or throttle. Always plan for airflow—use quiet fans or ducting systems.
Finally, don’t neglect placement. Mic too close to reflective surfaces, or treating only one corner, can cause a boxy, muffled sound. Balance your treatment across multiple reflection points.
Understanding these pitfalls helps you create a more effective and reliable recording environment. The key is to address each aspect—sound leaks, heat, and placement—to prevent common issues that diminish audio quality and equipment lifespan. For more insights, visit 2minutesread.com.
FAQ: Your most common closet booth questions answered
- Do I need soundproofing or acoustic treatment? Acoustic treatment reduces echoes and reflections but won’t stop sound from leaking out. For noise leaks, sealing gaps and using barriers works best.
- Where should I place acoustic panels in a closet booth? Behind the mic, at reflection points on walls and ceiling, and near the door for leaks.
- What’s the best way to handle heat in a sealed closet? Install a quiet, thermostat-controlled exhaust fan or duct system to keep airflow and temperature stable.
- Can I just use foam panels alone? Foam helps with reflections, but sealing gaps and ventilation are crucial for real quiet and safety.
- How many panels do I need for a small closet? Start with 4-6 panels on key reflection points; add bass traps if low-end issues occur.
Frequently Asked Questions
How much does sealing gaps improve soundproofing in a closet?
Sealing gaps around doors, outlets, and joints can block up to 70% of sound leaks, making a huge difference in quieting your space.Are bass traps necessary in a tiny closet?
If you notice low-end buildup or standing waves, bass traps can help. For most small closets, thick panels and treatment at reflection points are enough.What’s better—foam panels or moving blankets?
Foam panels excel at reflection control, while blankets are versatile and easy to hang. Combining both is often the best approach.How do I keep my PC cool in a closet setup?
Use a quiet, thermostat-controlled exhaust fan or ducting system. Proper airflow prevents overheating and fan noise overrunning your recordings.Can I build a closet booth on a budget?
Absolutely. Use affordable acoustic panels, weatherstripping, blankets, and DIY ventilation solutions. Focus on sealing gaps and placing treatment at reflection points first.Conclusion
Your closet can become a surprisingly effective recording space—if you treat it smartly. Focus on strategic placement of acoustic treatments, sealing gaps, and ensuring good airflow. That way, your sound is crisp, your gear stays cool, and you avoid turning your closet into a noisy, overheated box.
Remember: effective soundproofing isn’t just about foam. It’s about controlling reflections, leaks, and heat. When you get these right, your closet studio becomes a quiet, reliable partner in capturing your best work.